Author Topic: Crazy-modder JTAG Tutorial  (Read 44659 times)

Offline crazy-modder

  • Research & Development
  • Acid Modder
  • *
  • Posts: 854
  • Post quality +34/-2
  • Gender: Male
Crazy-modder JTAG Tutorial
« on: June 12, 2010, 01:11:38 AM »
XBOX 360 JTAG TUTORIAL, XENON ONLY!!!!******7371 OR LOWER ONLY, IT WONT WORK IF YOU HAVE A HIGHER DASH THAN THAT****


Introduction
In this tutorial you will learn how to make a Xenon Jtag with a dash 7371 or lower.
Parts Needed
  • 5X100ohm 1/4w 5% resistors
  • 3x330ohm 1/4w 5% resistors
  • 1xrj45 coupler
  • 1xcat5 cable
  • 1xdb25 (male) connector
  • 30awg wire
  • nandpro20e (needs to be on the root of the hard drive) get it from xbins


Tools Needed
  • Solder Iron


Difficulty rating: 4/5


Average Time to Complete: i.e 1-2 hours


Step By Step Tutorial

STEP 1:
Take your 3x330ohm resistors and solder one to each of the colors.  Take some 30awg wire and solder the wire from the resistors to the coordinating colors.
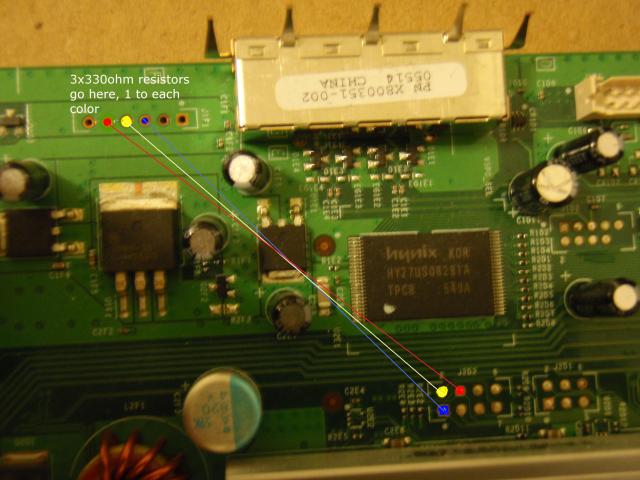

IT WILL LOOK LIKE THIS:
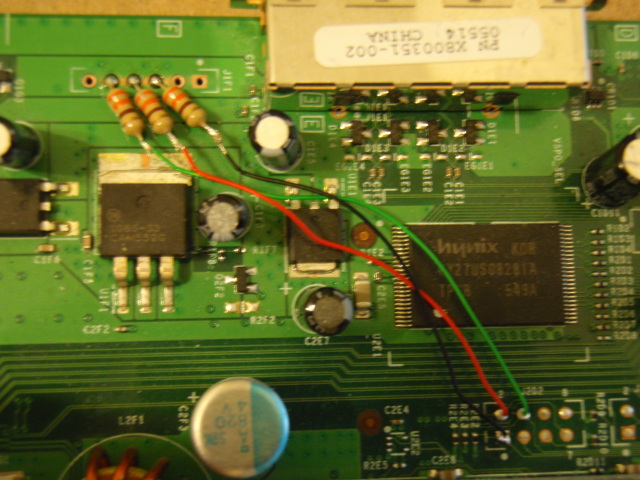

STEP 2:
Take 3 of your 100ohm resistors and solder one to each of the colors.
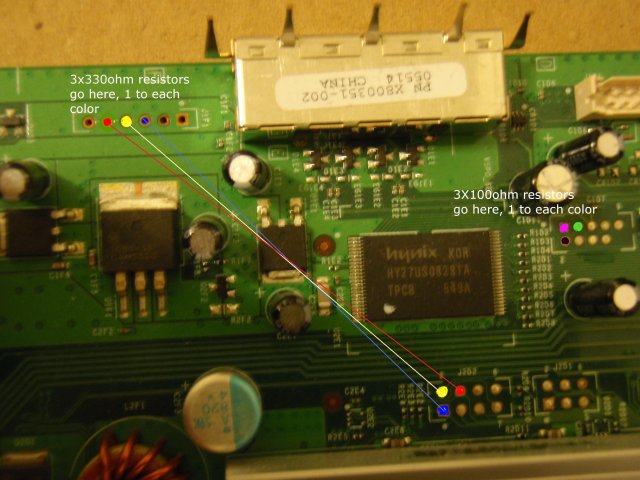

IT WILL LOOK LIKE THIS
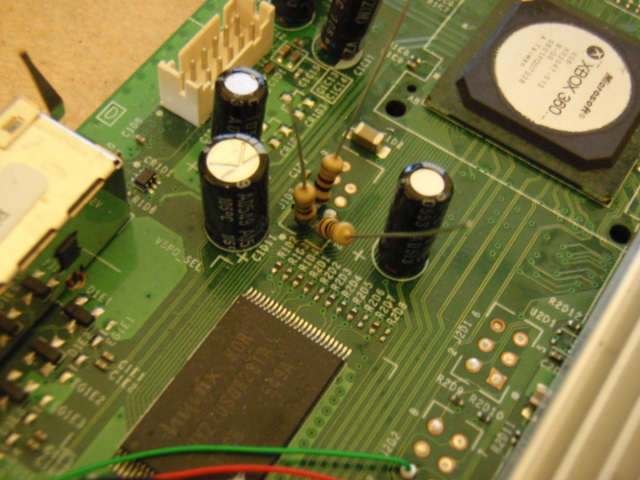

STEP 3:
Take your last 2 100ohm resistors and solder one to each of the colors.
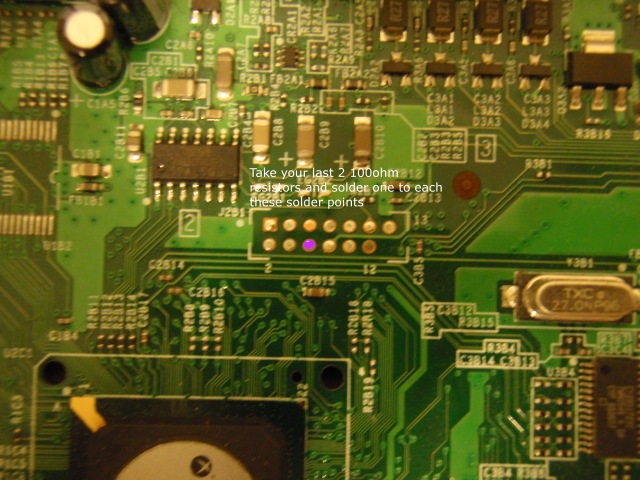

IT WILL LOOK LIKE THIS
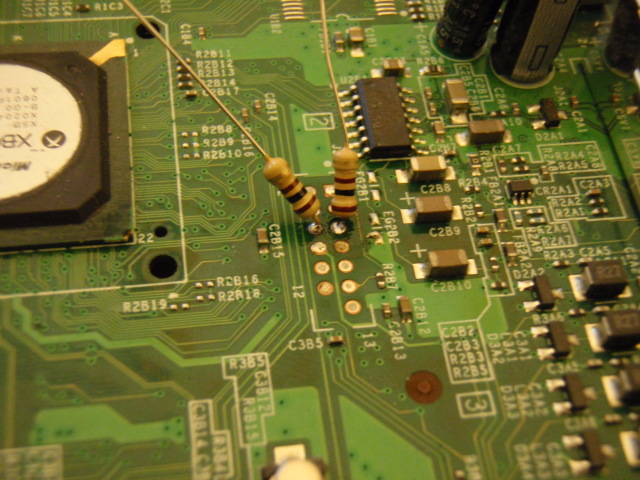

STEP 4:
Take your cat5 cable and cut it about 6-7" long (DO NOT CUT IT ANY LONGER THAN THAT)
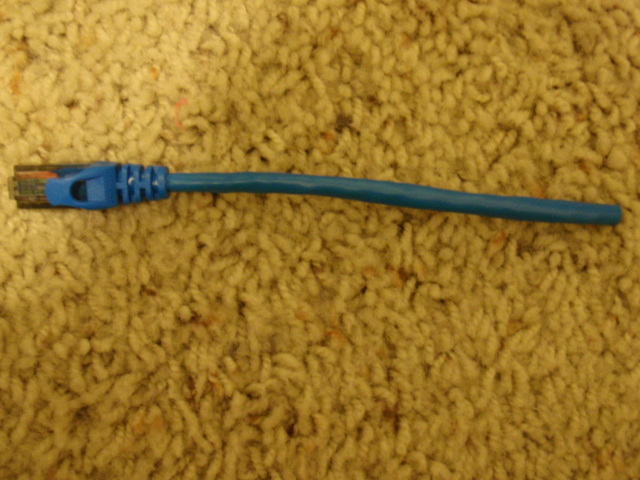
, and cut your second piece of cat5 cable
about 3" long.  The 3" one is going to be used on the inside of the xbox.  and the 7" one
is going to get soldered to our db25 connector.

STEP 5:
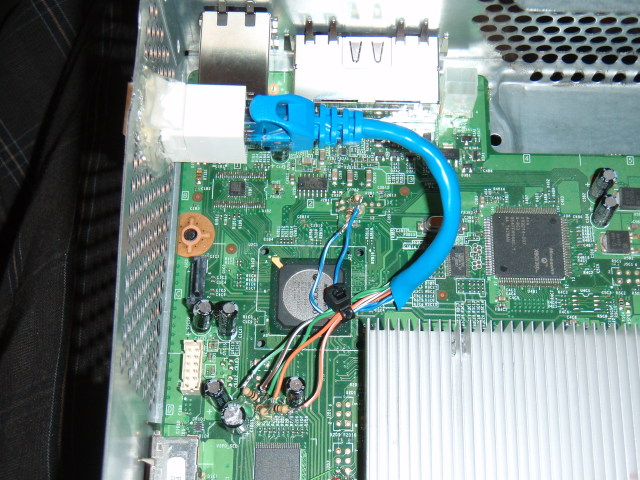
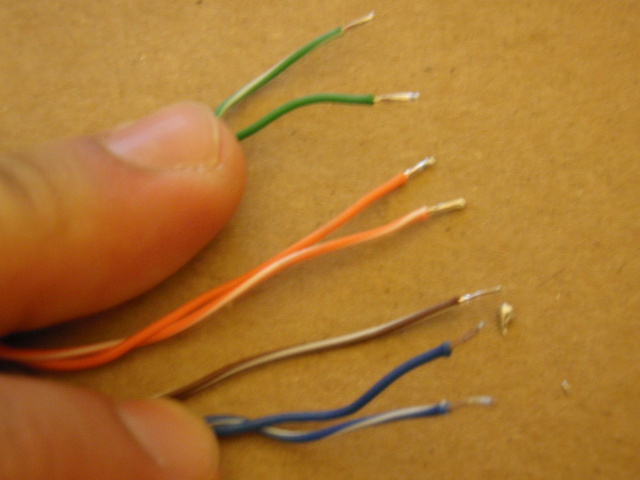
Ok now splice your 3" piece of cat5 cable. You will see a total of 8 wires. You only need 7 of them. It
does not matter what 7 you use, so take the 8th wire and cut it off so there are only 7 wires.
Next you need to tin your wires so you get a good connection.

STEP 6:
Ok now you really need to pay attention here.  Take your tinned/splice piece of 3" cat5 cable and take those 7 wires and solder each one of them to the 7 solder points.  It does not matter what wire goes where, just make sure all 7 of your wires are soldered to the 7 solder points on the mobo.
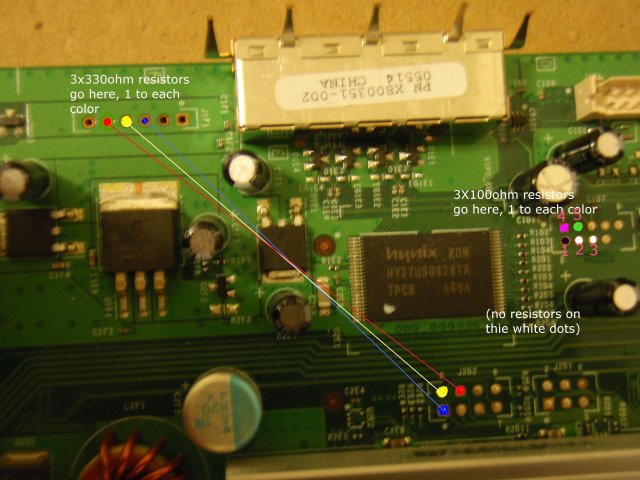
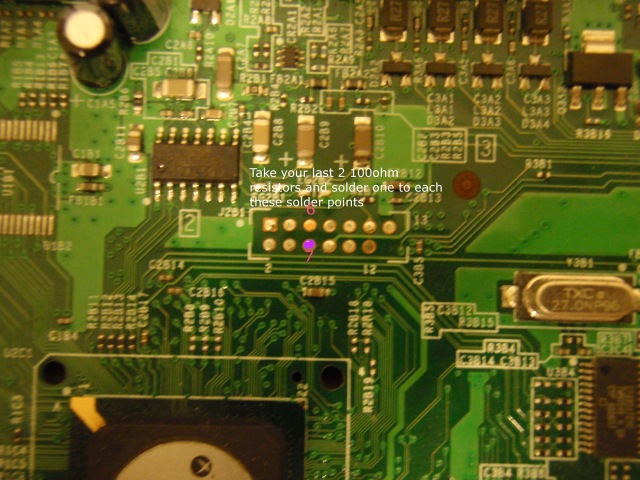
STEP 7:
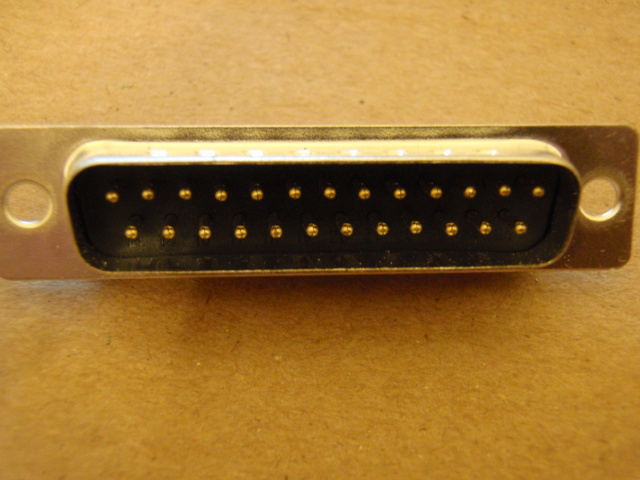
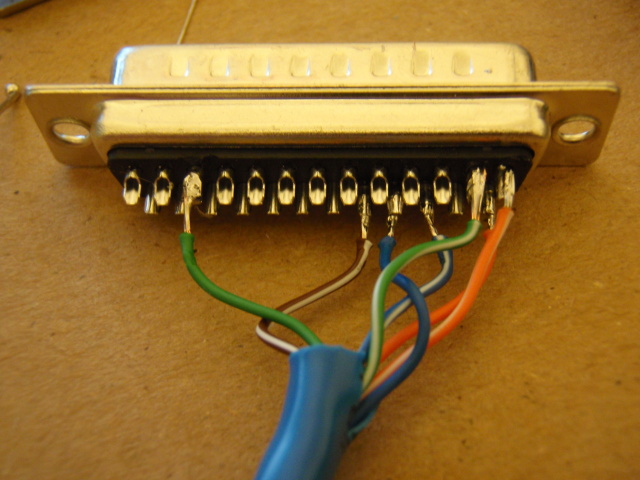
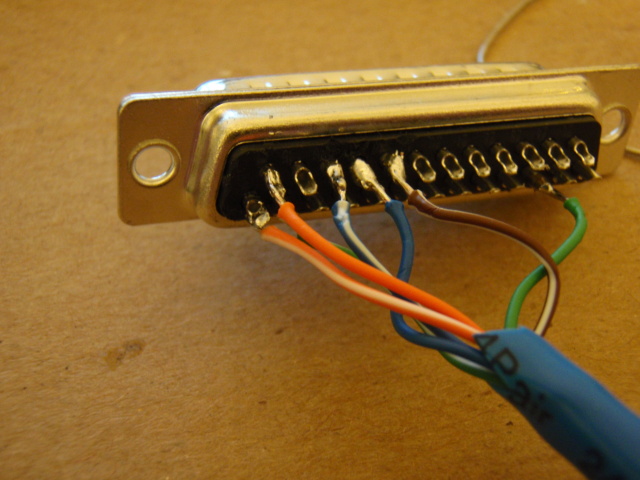
THIS IS THE MOST IMPORTANT PART!!!  Now its time to solder up your db25 to your cat5 cable.  PAY CLOSE ATTENTION.  You must follow how i have the numbers.  The numbers on the mobo are
going to match up with the numbers on the db25.  Pay close attention to the color of your wires
and where they must go.
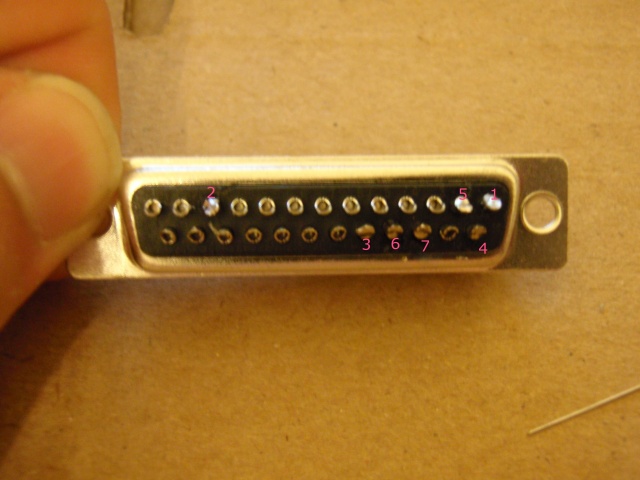


STEP 8:
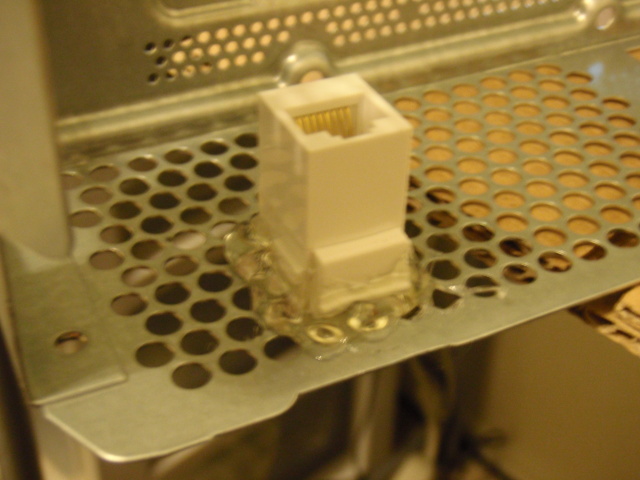
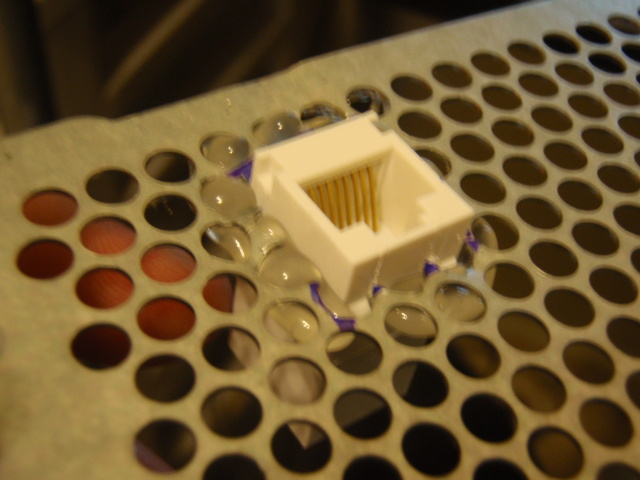
Take your rj45 coupler.  Put it up against the metal case of and measure where you want to put it.
Make sure to stay clear of the screw holes.  This is how i mounted my rj45. Once your rj45 is
mounted, plug in your cat5 to it.
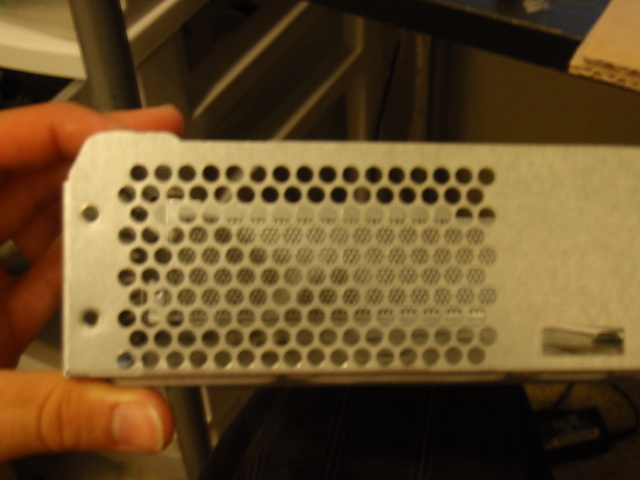


STEP 9: (DUMPING YOUR NAND)
Ok, you need need to plug in your finished db25 cable.  Cat5 end to the rj45, and the db25 to your
lpt port.  ALSO PLUG IN THE POWER TO THE XBOX
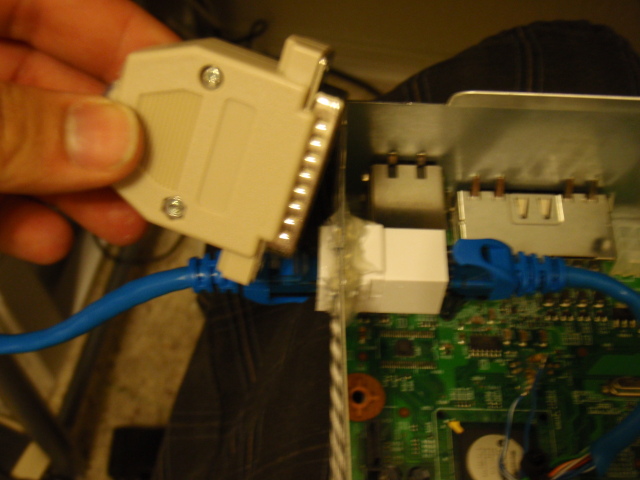
Ok, assuming you already have nandpro20e on the root of your hard drive.... Go to your command
prompt by going to start/run/cmd

Once your in your command prompt, your going to type "cd C:\nandpro" without the quotations.
It will look like this
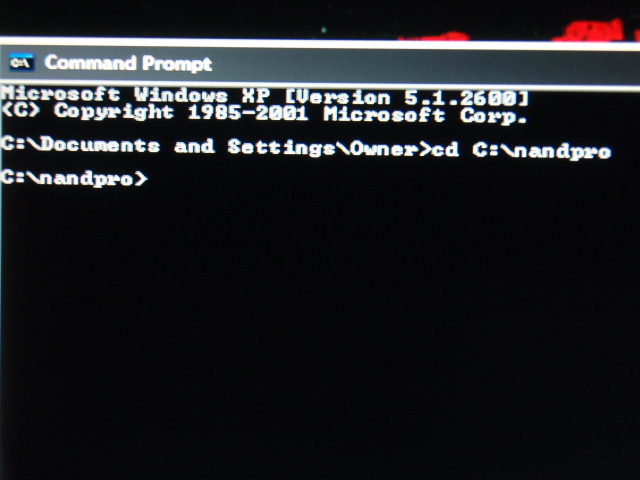
Now once you see that, type "nandpro.exe lpt: -r16 nand1.bin" without the quotes.
Then it will start to dump the nand, and if it does not then you need to check your wiring.  Also, if it does not work you can remove all the 100ohm resistors and retry.
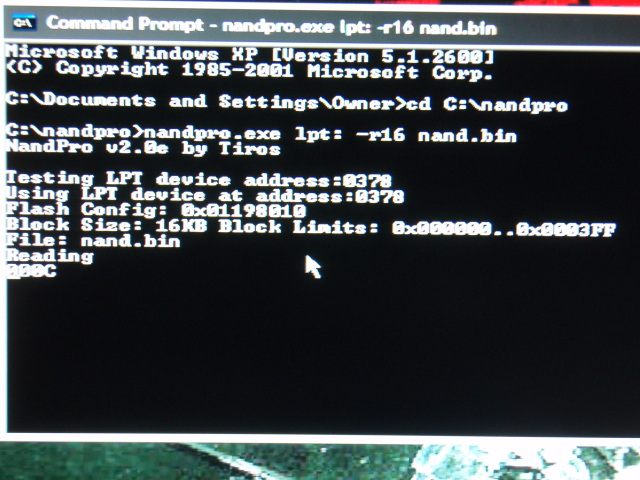

The next step of this tutorial will be flashing xbr, and updating xbr to freeboot 9199 dash. I will also be showing you how to install xex menu and a custom freestyle dash, coming soon.

XBOX 360 JTAG TUTORIAL PART 2

PART 2

DOWNLOAD
XBR, FREEBOOT V.032, XEXMENU, FLASH360 V1.0


[admin] please use virus scan on all files. 9/5/11 suspected worm file in xbins.exe file [/admin]

FREEBOOT v.032: http://www.megaupload.com/?d=AF40B
FLASH360 V1.0: http://www.megaupload.com/?d=
XEXMENU: http://www.megaupload.com/?d=3
XPORT360: http://www.megaupload.com/?d

new software download
please pm admin if file links are removed

PARTS NEEDED: USB THUMB DRIVE OR EXTERNAL HARD DRIVE, AND A HARD DRIVE TRANSFER KIT

STEP 1:
WE ARE GOING TO EXTRACT THE KV, INJECT, AND FLASH XBR.
MAKE SURE TO DOWNLOAD THE PROPER XBR FOR YOUR MOTHERBOARD AND
PUT IT IN YOUR NANDPRO FOLDER.  RENAME THE FILE TO SOMETHING SMALL,
SO ITS EASIER TO DEAL WITH.

OPEN UP YOUR COMMAND PROMPT.... START,RUN,CMD
NOW TYPE "cd C:\nandpro" without the quotes
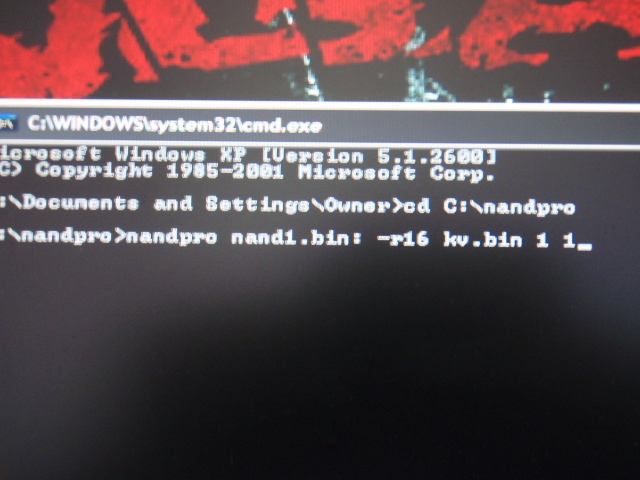
THEN TYPE "nandpro.exe nand1.bin: -r16 kv.bin 1 1" without the quotes
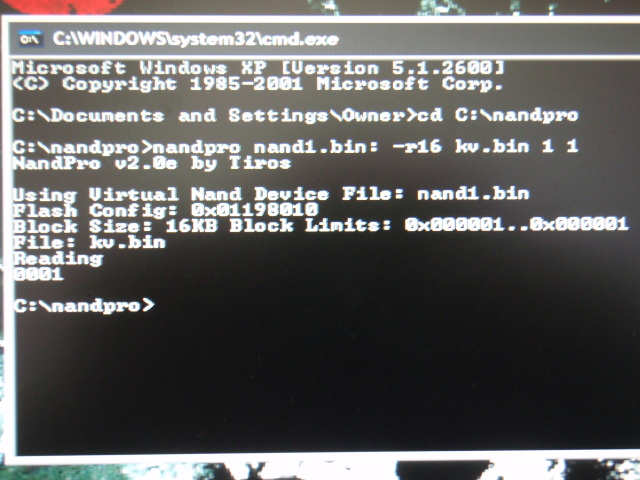
THEN TYPE "nandpro.exe nand1.bin: -r16 config.bin 3de 2" no quotes
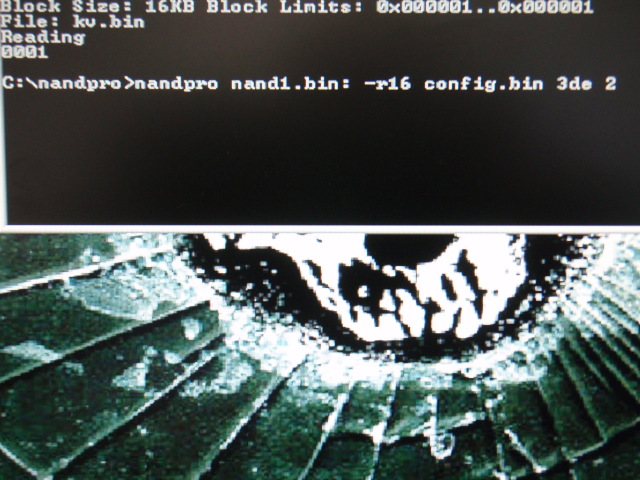
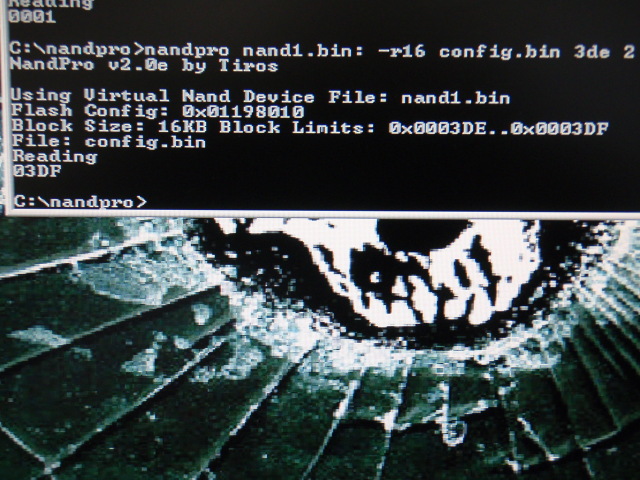
THEN TYPE "nandpro.exe xbr.bin: -w16 kv.bin 1 1" no quotes
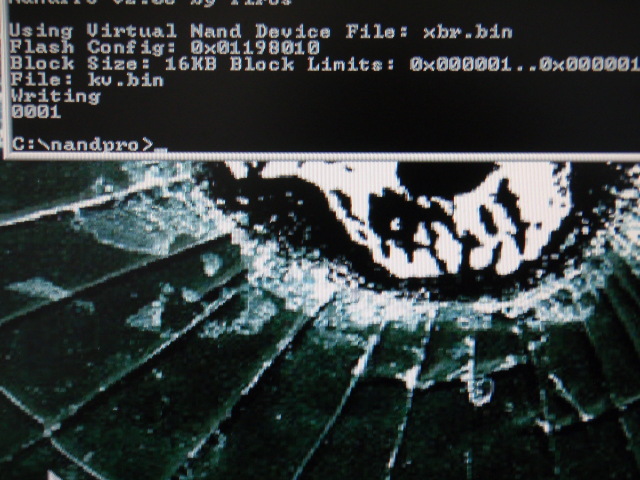

THEN TYPE "nandpro.exe xbr.bin: -w16 config.bin 3de 2" no quotes
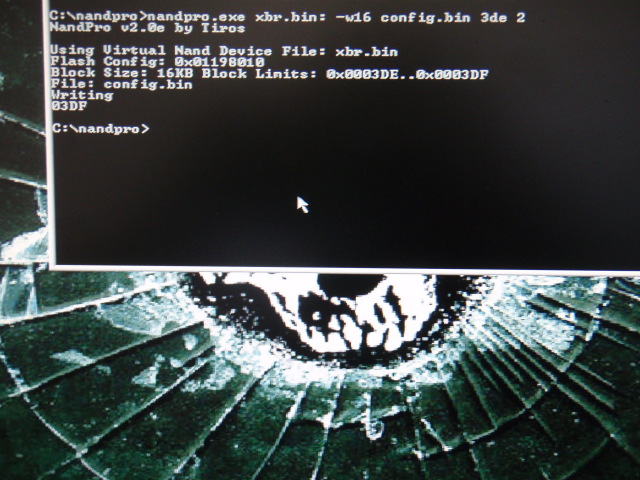

OK TIME TO FLASH

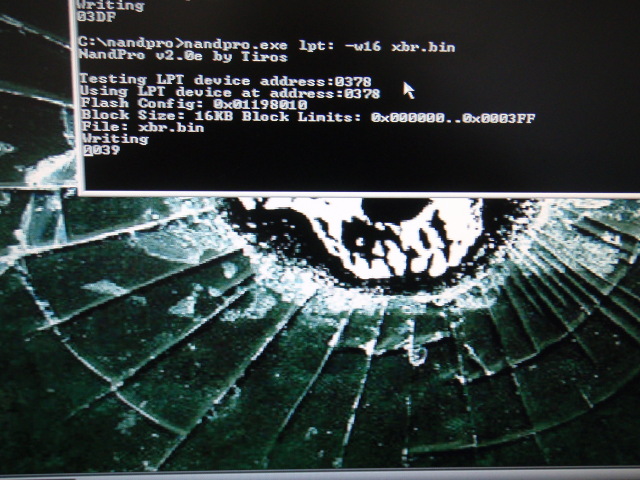
ONCE YOU TYPE THIS, IT WILL TAKE ABOUT 30-35 MINUTES TO FLASH
TYPE "nandpro.exe lpt: -w16 xbr.bin" no quotes

STEP 2:
35 MINUTES LATER=CONGRATS, YOU NOW HAVE A HOMEBREW XBOX360

STEP 3:
NOW LETS MAKE THIS THING BETTER,  RIGHT NOW YOU HAVE XBR WITH
AN OUTDATED DASH, IM GONNA SHOW YOU HOW TO UPDATE YOUR XBR
TO FREEBOOT 9199 FOR ALL YOU MOTIVATORS WANTING TO DO SOME
MODDED LOBBIES.

OK FIRST THING FIRST, YOU NEED TO GET THE CPU KEY, SINCE XBR IS LOADED
ON YOUR XBOX, IT HAS XELL BUILT INTO IT.

TURN ON YOUR XBOX BY PRESSING THE EJECT BUTTON ON THE DISC DRIVE
A BLUE SCREEN SHOULD COME UP AND LOOK LIKE THIS
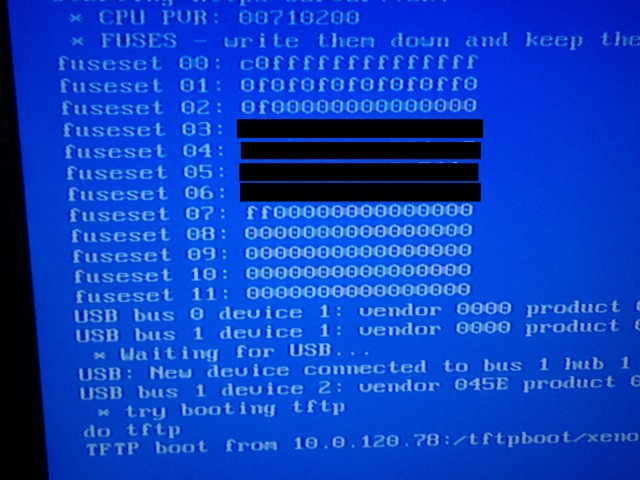
OBVIOUSLY I MARKED OUT MY CPU KEY.  NOW YOUR CPU KEY WILL BE A TOTAL OF 32 NUMBERS
AND OR LETTERS. SO PUT TOGETHER LINES 3/5 OR 4/6, AND THAT WILL BE YOUR CPU KEY.  MAKE SURE TO TAKE A PICTURE OF THE SCREEN, OR WRITE REALLY FAST.  OPEN NOTEPAD AND TYPE YOUR
CPU KEY IN THERE.

STEP 4:
BEST VIDEO TUTORIAL I COULD FIND.  I WOULD MAKE MY OWN VIDEO BUT I DONT HAVE ALL MY PARTS IN RIGHT NOW TO FINISH, AND ITS GONNA BE A COUPLE WEEKS UNTIL I GET THEM.  I WANT PEOPLE TO START JTAGGING BEFORE THEN.  SO HERE IS AN AWESOME VIDEO ON HOW TO PUT XEX MENU,AND UPDATE TO FREEBOOT WITH DASH 9199. (THE GUY IS KINDA OF WEIRD BUT ITS A GREAT VIDEO) http://www.youtube.com/watch?v=E_SoMbOaFVY&feature=related
« Last Edit: September 05, 2011, 05:20:40 PM by modded matt »

Offline Mogler

  • Research & Development
  • Who Farted ???
  • *
  • Posts: 219
  • Post quality +11/-0
  • Gender: Male
  • Seeding bittorrents like a digital pimp, son.
    • Indie Game Zone
Re: Crazy-modder JTAG Tutorial
« Reply #1 on: June 12, 2010, 02:09:11 PM »
This is probably the easiest to understand guide iv ever see. Nicely made, im looking forward to the " updating xbr to freeboot 9199 dash " part. :D


Youtube: CallawayINC
Blog: Mogler

Offline crazy-modder

  • Research & Development
  • Acid Modder
  • *
  • Posts: 854
  • Post quality +34/-2
  • Gender: Male
Re: Crazy-modder JTAG Tutorial
« Reply #2 on: June 13, 2010, 10:33:49 AM »
Ok guys, so here is pretty much a full tutorial on how to jtag and even upgrade your xbr to freeboot to 9199.  Im sure i will be adding more to it once i get the rest of my parts in, like showing how to load up freestyle dash, and put emulators on.

Offline FOOKz™

  • Hardware Modder
  • Research & Development
  • E = MC² Mad Scientist
  • *
  • Posts: 2070
  • Post quality +37/-2
  • Electronics Expert Electrical Engineer
Re: Crazy-modder JTAG Tutorial
« Reply #3 on: June 13, 2010, 05:17:56 PM »
I'm having way too much trouble doing this hack.

First I tried it on se7ensins.com and got as far as soldering the resistors and diodes....

Found some really vague tutorials that uses NICKNAMES for EVERYTHING. Calling Xellous.bin xell.bin and XL.bin and a bunch of other ridiculous things.

OK. I got as far as this Command and now im stuck.
Quote
THEN TYPE "nandpro.exe xbr.bin: -w16 config.bin 3de 2" no quotes


C:\nandpro>nandpro nand1.bin: -r16 kv.bin 1 1
NandPro v2.0b by Tiros

Using Virtual Nand Device File: nand1.bin
Starting Block:0x000001
Ending   Block:0x000001
Reading
0001

C:\nandpro>nandpro.exe nand1.bin: -r16 config.bin 3de 2
NandPro v2.0b by Tiros

Using Virtual Nand Device File: nand1.bin
Starting Block:0x0003DE
Ending   Block:0x0003DF
Reading
03DF

C:\nandpro>nandpro.exe xbr.bin: -w16 kv.bin 1 1
NandPro v2.0b by Tiros

Could not open Virtual Nand Device File: xbr.bin
Can not continue

C:\nandpro>
« Last Edit: June 13, 2010, 05:18:34 PM by FOOKz »

Follow my Instagram and subscribe to my YouTube

Offline crazy-modder

  • Research & Development
  • Acid Modder
  • *
  • Posts: 854
  • Post quality +34/-2
  • Gender: Male
Re: Crazy-modder JTAG Tutorial
« Reply #4 on: June 13, 2010, 05:36:22 PM »
Ok, first off you dont need to download xelloux or xell.  xbr has that built into it.  Make sure when you download xbr you put it into your nandpro folder

Offline FOOKz™

  • Hardware Modder
  • Research & Development
  • E = MC² Mad Scientist
  • *
  • Posts: 2070
  • Post quality +37/-2
  • Electronics Expert Electrical Engineer
Re: Crazy-modder JTAG Tutorial
« Reply #5 on: June 14, 2010, 12:33:37 AM »
Alright I got up to Part 2 Step 2.

I got past Step 1 just fine.

I'm not sure if im missing anything in part 1.

My Xbox will not turn on at all via the eject button, power button or controller.

When i load the xbr.bin file onto my Xbox360 it just won't start. But when i load my regular NAND.bin then it will be perfectly fine....
« Last Edit: June 14, 2010, 02:28:57 AM by FOOKz »

Follow my Instagram and subscribe to my YouTube

Offline Modded Matt

  • Site Owner
  • Administrator
  • Around the block
  • *
  • Posts: 4649
  • Post quality +65/-3
  • Gender: Male
Re: Crazy-modder JTAG Tutorial
« Reply #6 on: June 14, 2010, 02:51:55 PM »
crazy, I have seen other tuts which use diodes, and are mobo specific. please confirm this will work on zepher boards.

Offline crazy-modder

  • Research & Development
  • Acid Modder
  • *
  • Posts: 854
  • Post quality +34/-2
  • Gender: Male
Re: Crazy-modder JTAG Tutorial
« Reply #7 on: June 14, 2010, 03:06:14 PM »
Yes some people do use diodes.  But for xenon and zephyr use this tutorial

Offline Modded Matt

  • Site Owner
  • Administrator
  • Around the block
  • *
  • Posts: 4649
  • Post quality +65/-3
  • Gender: Male
Re: Crazy-modder JTAG Tutorial
« Reply #8 on: June 14, 2010, 04:48:08 PM »
on the db25 connector, you have the pins numbered and state that they must match the numbers on the mobo, I must be missing the numbers on the mobo. there is one pic which shows pin 6&7 but the rest of them are color coded, not numbered.

Offline crazy-modder

  • Research & Development
  • Acid Modder
  • *
  • Posts: 854
  • Post quality +34/-2
  • Gender: Male
Re: Crazy-modder JTAG Tutorial
« Reply #9 on: June 14, 2010, 05:33:15 PM »
look at part 1 step6 and step7, it shows the solder points color coded and numbered

Offline Ben.

  • Club AM VIP
  • Acid Modder
  • *
  • Posts: 657
  • Post quality +2/-0
  • Gender: Male
« Last Edit: July 09, 2010, 04:00:45 AM by Ben. »

Offline crazy-modder

  • Research & Development
  • Acid Modder
  • *
  • Posts: 854
  • Post quality +34/-2
  • Gender: Male
Re: Crazy-modder JTAG Tutorial
« Reply #11 on: July 09, 2010, 05:53:29 AM »
You can use this, i just purchased one and cant wait for it to get here.  This will dump your nand way faster than the lpt cable.  Lpt takes like 30-35 minutes, and i was told this takes like 5-10minutes.  I will let you know if its any good when i get it. http://www.diygadget.com/xbox-360-usb-spi-jtag-utility-bundle-with-solderless-flasher-addon.html

Offline sakobatoneko

  • MFH
  • Granny Spanker
  • *
  • Posts: 460
  • Post quality +0/-0
Re: Crazy-modder JTAG Tutorial
« Reply #12 on: July 09, 2010, 05:59:29 AM »
I used 2 diodes instead of the 3 resistors for my xenon and it works fine. I might make a tut on how to jtag the 360 using a different method that i used.

Offline Ben.

  • Club AM VIP
  • Acid Modder
  • *
  • Posts: 657
  • Post quality +2/-0
  • Gender: Male
Re: Crazy-modder JTAG Tutorial
« Reply #13 on: July 09, 2010, 06:18:22 AM »
Will the USB to DB25 to USB work though?

That link is for a US site and shipping to the UK takes forever..

Post Merge: July 10, 2010, 04:26:34 AM
or this one?
http://cgi.ebay.co.uk/New-USB-DB25-Female-Port-Print-Converter-Cable-LPT-/350294052591?cmd=ViewItem&pt=LH_DefaultDomain_0&hash=item518f270eef#ht_2735wt_911
« Last Edit: July 10, 2010, 04:26:34 AM by Ben. »

Offline crazy-modder

  • Research & Development
  • Acid Modder
  • *
  • Posts: 854
  • Post quality +34/-2
  • Gender: Male
Re: Crazy-modder JTAG Tutorial
« Reply #14 on: July 11, 2010, 04:51:45 PM »
I honestly would not try the db25 to usb. It would give you the exact same results as making your own lpt to dump the nand.  There are tutorials out there on how to make your own usb nand extractor.  Ill probably make a tutorial in the next couple weeks depending if i stay with this site or not.

Offline Rodent

  • XBOX,XBOX360,PS3,WII
  • Moderator
  • Around the block
  • *
  • Posts: 2983
  • Post quality +75/-5
  • Gender: Male
  • MODDER, REPAIR, CUSTOM IDEAS.
Re: Crazy-modder JTAG Tutorial
« Reply #15 on: November 08, 2010, 06:56:05 PM »
quick question about Jtag, I have 3 xboxes i bought and all have the update dashboard higher then 7371, is there any way i can still jtag one of them, all of them have the latest dashboard updates. think i am screwed.

 Tracey: I cant believe Rodent of all people made my damn day
3D0: snacks cartoons and naps  lol sounds like rodents typcial day :rofl:
Rodent consoles mods

Offline crazy-modder

  • Research & Development
  • Acid Modder
  • *
  • Posts: 854
  • Post quality +34/-2
  • Gender: Male
Re: Crazy-modder JTAG Tutorial
« Reply #16 on: November 08, 2010, 06:58:56 PM »
No, unfortunately you will not be able to jtag them

Offline Rodent

  • XBOX,XBOX360,PS3,WII
  • Moderator
  • Around the block
  • *
  • Posts: 2983
  • Post quality +75/-5
  • Gender: Male
  • MODDER, REPAIR, CUSTOM IDEAS.
Re: Crazy-modder JTAG Tutorial
« Reply #17 on: November 08, 2010, 07:26:54 PM »
thanks , will keep looking

 Tracey: I cant believe Rodent of all people made my damn day
3D0: snacks cartoons and naps  lol sounds like rodents typcial day :rofl:
Rodent consoles mods

Offline EasyE

  • Motor Mouth
  • *
  • Posts: 83
  • Post quality +2/-1
  • Gender: Male
  • Acidmods User
Re: Crazy-modder JTAG Tutorial
« Reply #18 on: January 18, 2011, 12:42:02 AM »
Can i use 330 ohm resistors for the whole Thing insteqd of 100 ohm? That is what i have here besides 10k resistors.

Post Merge: January 18, 2011, 04:25:48 AM
Also do i have to use a coupler or can i just wire straight from the mobo to the db25 connector
« Last Edit: January 18, 2011, 04:25:48 AM by EasyE »

Offline Modded Matt

  • Site Owner
  • Administrator
  • Around the block
  • *
  • Posts: 4649
  • Post quality +65/-3
  • Gender: Male
Re: Crazy-modder JTAG Tutorial
« Reply #19 on: January 18, 2011, 05:51:18 AM »
thas like asking if you can play a playstation game on the xbox...wrong part.

Offline FOOKz™

  • Hardware Modder
  • Research & Development
  • E = MC² Mad Scientist
  • *
  • Posts: 2070
  • Post quality +37/-2
  • Electronics Expert Electrical Engineer
Re: Crazy-modder JTAG Tutorial
« Reply #20 on: February 06, 2011, 12:19:42 PM »
The video for step 4 is missing. Just needed it as a refresher.

*same weird guy updated video

heres the other video:
ModdingTutorials - How to Install freeBOOT v0.04 on your JTAG
« Last Edit: February 06, 2011, 12:21:29 PM by FOOKz »

Follow my Instagram and subscribe to my YouTube

Offline Anonamous

  • The Unknown Identity
  • Granny Spanker
  • *
  • Posts: 472
  • Post quality +14/-1
  • Gender: Male
  • Electrical Engineering Student
Re: Crazy-modder JTAG Tutorial
« Reply #21 on: March 25, 2011, 08:04:33 AM »
What did you use to cut the casing so that you can mount the rj45 coupler? (the metal casing)

Offline FOOKz™

  • Hardware Modder
  • Research & Development
  • E = MC² Mad Scientist
  • *
  • Posts: 2070
  • Post quality +37/-2
  • Electronics Expert Electrical Engineer
Re: Crazy-modder JTAG Tutorial
« Reply #22 on: March 25, 2011, 08:17:56 AM »
Dremel or tin snips

Follow my Instagram and subscribe to my YouTube

Offline Anonamous

  • The Unknown Identity
  • Granny Spanker
  • *
  • Posts: 472
  • Post quality +14/-1
  • Gender: Male
  • Electrical Engineering Student
Re: Crazy-modder JTAG Tutorial
« Reply #23 on: March 25, 2011, 11:47:32 AM »
Dremel or tin snips

would it do any damage to my diagonal cutters if I use those? I'm only asking because they say copper only

Offline jrfhoutx

  • The Long-Winded One
  • Acidmods Alumni
  • Around the block
  • *
  • Posts: 2582
  • Post quality +35/-8
  • Gender: Male
  • Dōmo, Konnichiwa, :censored:es...
    • Misadventures in Mediocrity and Modding
Re: Crazy-modder JTAG Tutorial
« Reply #24 on: March 25, 2011, 12:11:45 PM »
depends on the size and intended use of them. I have some general use ones from working in an auto shop, and I would use those cause they're heavy duty and intended to cut large bits of metal, but I wouldn't ever use my modding wire cutters... if they say copper only then i wouldn't use them and risk damaging them...
« Last Edit: March 25, 2011, 01:02:26 PM by jrfhoutx »
AcidMods Ninja... You won't know I'm there until you're gone...


All of these sigs are from the original acidmods sig comp...  @jrfhoutx  "No respect, no respect at all... that's the story of my life." --

Offline crazy-modder

  • Research & Development
  • Acid Modder
  • *
  • Posts: 854
  • Post quality +34/-2
  • Gender: Male
Re: Crazy-modder JTAG Tutorial
« Reply #25 on: March 25, 2011, 12:22:00 PM »
You can actually use some type of clippers to cut through the metal cage. Take your rj45 and trace around it on the case and clip a square out. better then using a dremel.

Offline Rodent

  • XBOX,XBOX360,PS3,WII
  • Moderator
  • Around the block
  • *
  • Posts: 2983
  • Post quality +75/-5
  • Gender: Male
  • MODDER, REPAIR, CUSTOM IDEAS.
Re: Crazy-modder JTAG Tutorial
« Reply #26 on: March 25, 2011, 12:45:17 PM »
You can actually use some type of clippers to cut through the metal cage. Take your rj45 and trace around it on the case and clip a square out. better then using a dremel.


They make a hand held nibbler tool that will work great for this

 Tracey: I cant believe Rodent of all people made my damn day
3D0: snacks cartoons and naps  lol sounds like rodents typcial day :rofl:
Rodent consoles mods

Offline jrfhoutx

  • The Long-Winded One
  • Acidmods Alumni
  • Around the block
  • *
  • Posts: 2582
  • Post quality +35/-8
  • Gender: Male
  • Dōmo, Konnichiwa, :censored:es...
    • Misadventures in Mediocrity and Modding
Re: Crazy-modder JTAG Tutorial
« Reply #27 on: March 25, 2011, 01:06:43 PM »
yeah, it's the same style as the one they used to sell for cutting cases (may even be the same one), but rated for steel. I just saw one at fry's this morning...
AcidMods Ninja... You won't know I'm there until you're gone...


All of these sigs are from the original acidmods sig comp...  @jrfhoutx  "No respect, no respect at all... that's the story of my life." --

Offline Anonamous

  • The Unknown Identity
  • Granny Spanker
  • *
  • Posts: 472
  • Post quality +14/-1
  • Gender: Male
  • Electrical Engineering Student
Re: Crazy-modder JTAG Tutorial
« Reply #28 on: March 26, 2011, 08:36:11 AM »
OK thx guys. I just wasnt sure and I most definatly didnt want to ruin mine or my stepdads electical tools cause they can be expensive. Especially the Klein tools lol

Offline drummerdude

  • BST BAN
  • ♥ Poker Champ ♠♣
  • *
  • Posts: 237
  • Post quality +11/-5
  • Gender: Male
  • Acidmods User
Re: Crazy-modder JTAG Tutorial
« Reply #29 on: April 05, 2011, 03:27:32 PM »
im gonna buy a pre nxe dashboard xbox 360. if it isnt an xexnon, anybody know of any other tuts i can use, for the other types?

"I'm not a very tall person, however I show self-confidence of a bigger person"


SMF spam blocked by CleanTalk
SimplePortal 2.3.5 © 2008-2012, SimplePortal