PSP Slim and Lite Disassembly and Clear Case Tutorial By Kenshinffx
IntroductionOkay, I'm back with yet another Tutorial on Disassembly, but this time I will complete it with a full walkthrough on installing again into the Clear Case! I'm borrowing T3K's tut but he won't mind... I'll rewrite it.. So let's get started on this baby shall we?
Tools Needed - 1x 0 or 00 Philips Screwdriver
- 1x small tweezers
- 1x small flat-head screwdriver
Step By Step Tutorial1- The slim is by far easier to tear apart than the Phat, so this should go quick.
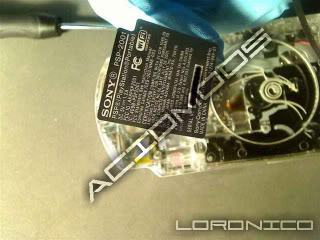
The first thing you will have to do is remove the Warranty Sticker from the Battery compartment, This uncovers the Bottom Screw. Also make sure you remove the second larger sticker as well.. It covers the Wifi Cable.
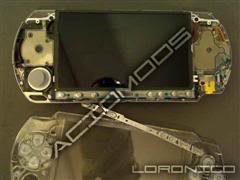
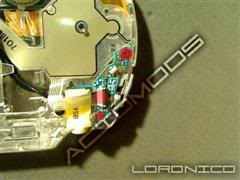
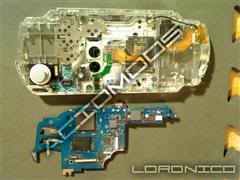
2- You will also notice that instead of 6 screws on the back (like the original PSP) the new Slim & Lite PSP only has 4 screws (indicated by the 4 red dots), but there are also 3 screws along the trim that must be removed as well, one at the bottom, and 2 at the top next to the USB port. Once you remove them, The Face-plate may be removed.
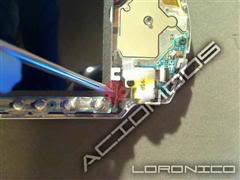
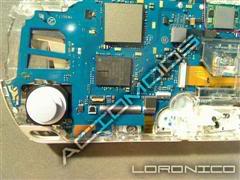
3-Now you can see the internals of the PSP, unlike the original PSP, the home bar’s ribbon cable isn’t attached to the power board, instead it is attached underneath the LCD screen. The Home Bar’s clips must be released from both ends of it, not unlike the original, then let the home bar to hang as shown. It's actually rather easy to do this, Just put the flathead under the right side and kinda pry it up, It won't come off the front like the original. Then move over to the Left and repeat. Easy!
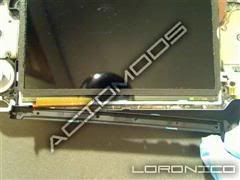
4-To remove the LCD you gently pry the clips on the edges, much like you would for the original PSP. The Clip has a little peg it holds onto, Basically you take your Screwdriver and slightly pry up from the bottom of the screen, It's not really atached. So it will come up worlds easier than the original.
5-Now, open the ribbon clamps for the LCD screen and Home bar, by flipping up the tabs on the clamps. You want to do this very delicately with the smaller one, It's the backlight clip and it's usually the first one to break..

6-Next, remove the metal shielding, it is taped down to the backplate, So be wary of that.
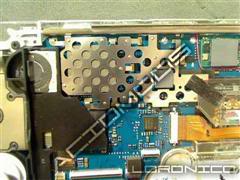
Note: I have heard the new Mobo's in the slim have the Metal shielding attached to the Mobo. If yours is like this then don't try to remove it.
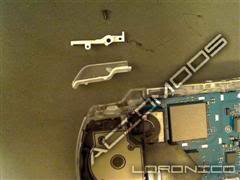
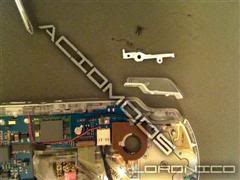
6a-Next remove the metal piece from the top of the Case, it supports the LCD Screen!
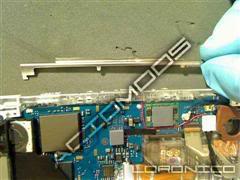

7-OK, remove the screws that are holding the trigger buttons in place, and remove the Triggers. In sonys perspective I love these Trigger Guards... Maybe, just maybe, They got tired of having the triggers plink off the table when you take off the faceplate never to be seen again, just like us...LOL
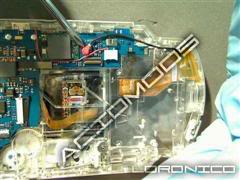
8-Open the Clamp of the D-Pad on the Mobo, It's pretty easy to tell, and slip your tweezers underneath it to unseat the cable.

Note: Make sure that you are wary of how hard it is to get that cable back in there, Cause once you need to put it back together, It will be crazy
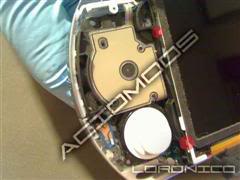
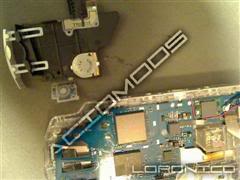
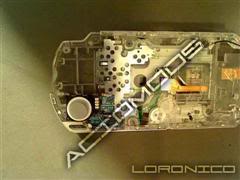
9-There is a tiny Black screw at the bottom of this Assembly holding it on as seen in the picture above, Unscrew it. You will also have to remove the sticky backed trigger button pad from its shelf on the back-plate, It's easy just peel it off, It's nothing like the old triggers. Now open the Memory Stick door completely, that way you can take out the Dpad assembly.
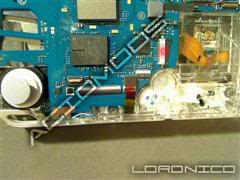
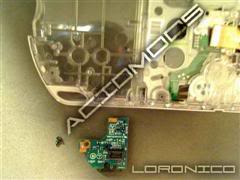
10-Remove the screw holding the power board on, (It's much more tiny this time so remember to be wary of that black switch nub!) and open the ribbon cable clamp, Removing the Powerboard should be self explanitary, It is hooked under a smal piece of the Backplate though.
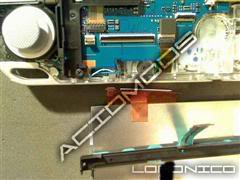
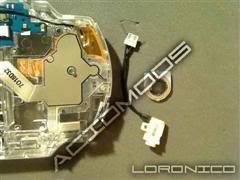
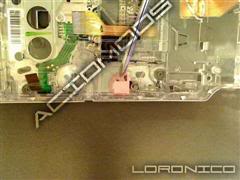
11-Now remove the screw that is holding the charge plug and disconnect the charge plug terminal. This is a pain to do, I found that I used a screwdriver flathead and just gently pryed it apart. The charge plug is held in by both the screw and plastic clips so gently pry them open until you can easily remove the charge plug. You can also remove the right side speaker by gently prying it out of its clips. I found mine was easy to get out.
12-Now, open the ribbon cable clamp for the face buttons (Square triangle, etc.) and remove the sticky backed trigger button pad from it’s self on the back-plate, and remove the face button FPC (Flexible Printed Circuit). This is easy as well, Make sure to take this time and restick it to it's proper seat on the Clear Case.
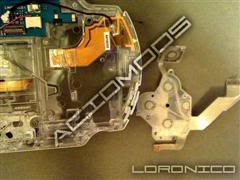
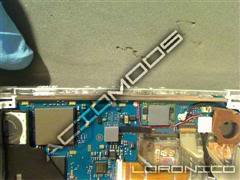
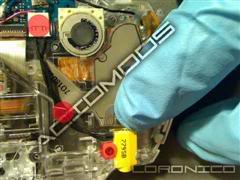
13-To remove the Mother Board, also known as the MoBo, you must remove the ribbon cable clamps for the UMD laser and drive assembly. These are located on the Bottom and Right of the Mother Board, The one on the bottom is self explanitary but the other is just like the phat. You pull those tiny black nubs towards the right side and the cable will move freely.
13a-The terminal for the WiFi antenna is next. that's just a small metal clip at the top. Just pull it off the top. It's kinda like a bottlecap..
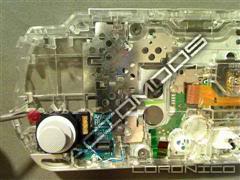
14-Then the Mobo can be lifted out, remember that the USB port sticks through the trim so you will have to lift from the bottom of it and pull down to unseat the Mobo.
15-Once again remove the metal shielding, Try to make sure you take careful note of where it is, If you don't put it in the exact same place, the Mobo won't sit right when it's reassembled.
16-Now, remove the screw holding the analog nub in place and remove it. This comes out easily. I personally feel this was one of the best ideas that Sony had, having it screw into the Faceplate like before just creates too much margin for error.
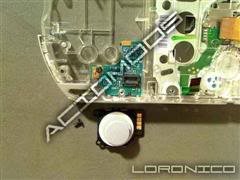
17-Underneath you will see the daughter board for the AV port, remove the screw holding it in and take out the board, remembering to lift from the top and slide the port out..
18-Now the really fun part, (OMG T3K had no idea how right he was) This is by far the most difficult part of the Teardown, Removing the UMD Door. First remove the white clip that holds the spring in place.
19-Note: The Spring has two sides, the short end is under a few pieces of the Backplate and the Long piece is in a tiny hole in the hinge for the UMD Door.. Make sure you are wary of how it's put in next to the white plastic piece.. Otherwise you will have a hard time putting it back.
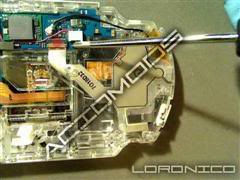
20-Next to remove the UMD door, T3K's way was not the easiest from what I found. I found an easier way. I couldn't get it done through T3K's method. Basically, you take that flathead (make sure it's small) and pry it in from the back with the door open, You can just put it on the hinge and pry the faceplate up so as to not risk the Breaking of the UMD Door hinge, The Hinge should pop out, then the other hinge is way easy, but the door isn’t off yet. You have to remove the H frame hinge from the UMD door, to do this slide the H frame to the bottom of it’s tracks on the door, and lateral to the door, slightly squeeze above the pins and they will be free.
21-Now remove the 4 screws from the UMD laser drive and remove it, This may take some pushing from the back of the Backplate as it's not too easy to get in there. To get the H frame off you will have to either remove the small sticky-backed rubber blocks from the sides of it’s hinges with your tweezers, or slide a small flat-head screwdriver in between to allow enough space to remove the hinges. I removed the Blocks, It's the easiest. The hinges come off easily once the blocks are gone.
22-Next you Need to remove the Screw Pieces. They are in the top of the Backplate to hold the Screws in.. You get them out by taking your flathead and prying from the top until they pop loose and remove them, Getting them back in sucks but you just jam them back in essentially.
23-Now you need to release the UMD Door Clip from the back of the backplate. It's comes out easy enough if you remove the clips from the backside. And You should have the Spring at the top come out relatively well too.. That's to keep the pressure on the Door clip. You should take the time to move these and the Screw Metal pieces to their respective Places in the Clear Case.
24-Now it's bare as hell aside from the Frames, They have Pegs that enter holes, So you just Push up on the Frames and they will come loose.. Thankfully, Sony Integrated the Entire Power Switch into the Frame so do disassembly of that is required! Thanks SONY! All but the Top USB Frame. That one is a bit trickier.. Take the time to install the original frames on the Clear Case if you decide to.. I did.
25-To Remove the top USB frame. You unclip the Sides of the frame off and then slowly slide the flathead under it And it should just pop off. Then put that on the Clear Case.
26-Well, Now you have a Crapload of parts and a Completely Disassembled SLIM! YAY! You did eet! Now it's time to put it back together..
27-You basically work in reverse. First put on the UMD Door Clamp if you haven't already.. And then Re-screw in the UMD Drive itself making sure to feed the ribbons through their holes at the side and bottom.Now put the H Frame back on and Install the Clear UMD Door on the case with the H Frame.. Now comes another tricky part. If you were paying attention you should know how the spring goes into the UMD Door.
28-Now rescrew in the Daughter Board for the AV Port. And the on top of it, The Analog Nub. I hope you paid attention to where that Metal shielding goes.. It goes on next. Then on top of it goes the Motherboard, remember to feed through the Ribbon Cables for the UMD, and that the top must go in first. Reconnect the Cables and make sure your Motherboard is seated in the Daughter card, there is a port on it.
29-Reconnect the Power Cable and put the Power Plug back into it's socket. And reconnect the ribbon for the ABXY FPB. Rescrew in the Power switch being mindful of the Black nub and making sure that when it's in, the switch can be flicked back and forth with the actual switch on the Frame. Reconnect the Ribbon to the Power Switch.
30-Next comes the Dpad Assembly, Make sure you connect the ribbon before attempting to get the Assembly sitting down so you can screw it in. And then make sure to resticky the Trigger back onto the Backplate.
31-Time to put on the Triggers! You just put the Triggers into place and then screw on the Trigger Guards. Then push your trigger in and out a couple of times to make sure it moves freely. Now you put on the Metal Shielding.. It's pretty easy to figure out how it goes in if you remember that it was taped down to the Backplate.
32-Now it's time for the LCD Screen. You just Make sure to carefully reconnect the ribbons and push down the clamps to resecure them. and then the Screen oddly enough doesn't seem to Clamp down or be secured.. Maybe this was due to the removal of that Metal piece I mentioned earlier. But it doesn't seem to matter. just put the LCD back down.
33-Now the homebar. It easily clicks into place. Now transfer the Buttons and Homebar buttons from Faceplate to Faceplate. It's really easy, unlike the first PSP, it's much more simple. and now time to resecure the Faceplate to the top of the PSP, being mindful of the little clips that hold it in..
34-Once you replace the screws in the backplate and trim.. Push the power switch and test for power, functionality of buttons, the stick functionality, and Screen. If all is well you are Golden!
Congratulations! You completed the Clear Case PSP Slim Mod!
CreditsI'd like to thank Cyberpyrot and Coolmods for the chance to be one of the first to do this mod, And T3KN1K4L for wiriting such a great Tutorial the first time, Also just caus ehe's my bud and let me jack half of his tut..
And thanks to Acidmods for just being there and giving me a place to play!
See you all soon!


