Author Topic: Jtag tutorial updated 11/10/12  (Read 50621 times)

Offline Modded Matt

  • Site Owner
  • Administrator
  • Around the block
  • *
  • Posts: 4649
  • Post quality +65/-3
  • Gender: Male
Jtag tutorial updated 11/10/12
« on: September 13, 2011, 05:37:38 PM »
XBOX 360 JTAG TUTORIAL


Introduction
This tutorial will show you how to preform the Jtag mod on all applicable xbox360 units. This tutorial will be taken from many sites all over the web. I recently preformed this hack on my xbox and had a lot of problems getting all the info together. I am going to try to make the most complete and up to date jtag tutorial available. Once again this is only for xboxes running a dashboard of ***7371 or lower.

This tutorial is derived from the crazy modder tutorial and other various sites, pics are new, or tagged by the various sites they were taken from. This is done to help create a complete tutorial.


Parts Needed
  • 5X100ohm 1/4w 5% resistors
  • 3x1N914 - 1N4148
  • 1xrj45 coupler
  • 1xcat5 cable
  • 1xdb25 (male) connector
  • 30awg wire
  • nandpro23e (will be in the DL package)


Tools Needed
  • Soldering Iron
  • solder+flux
  • razor knife
  • dremel or metal snips
  • hot glue gun


Software Needed
Difficulty rating: 4/5


Average Time to Complete:  2-3 hours


step by step tutorial

step 1
Determine which type of mother board you have by looking at this picture.
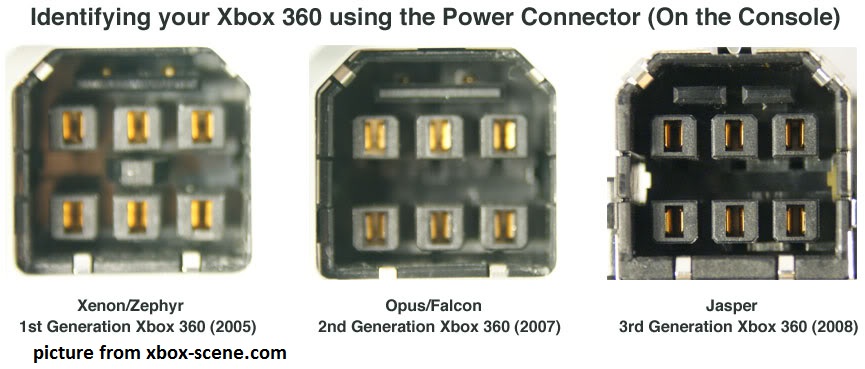

step 2
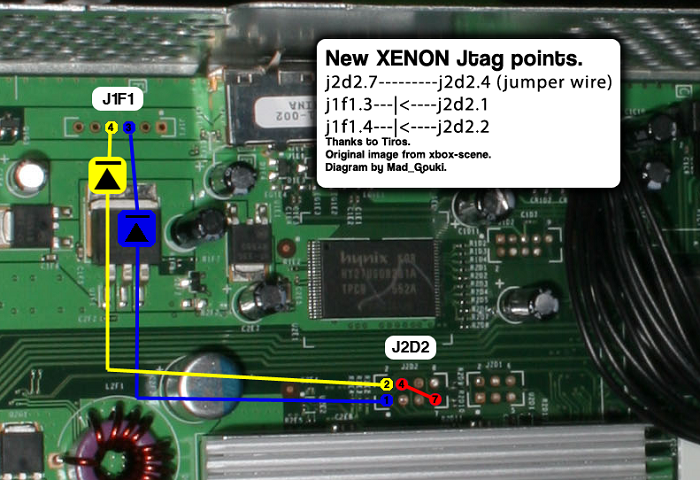
Make jtag connections, look at the picture below for your type of motherboard
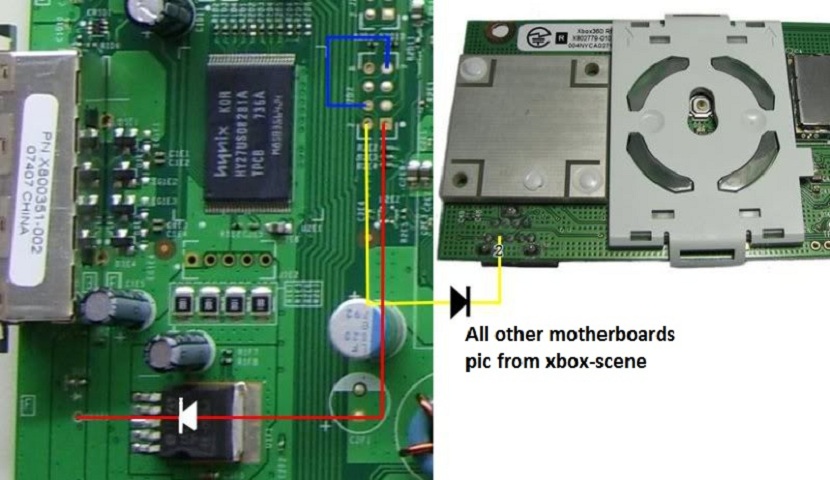


edit: here is an alternate wiring method that has been found to replace the "all other board" pic. this this new "reverse" method, all connections for jtag are done on the bottom of the mobo and are easier to get to.

step3
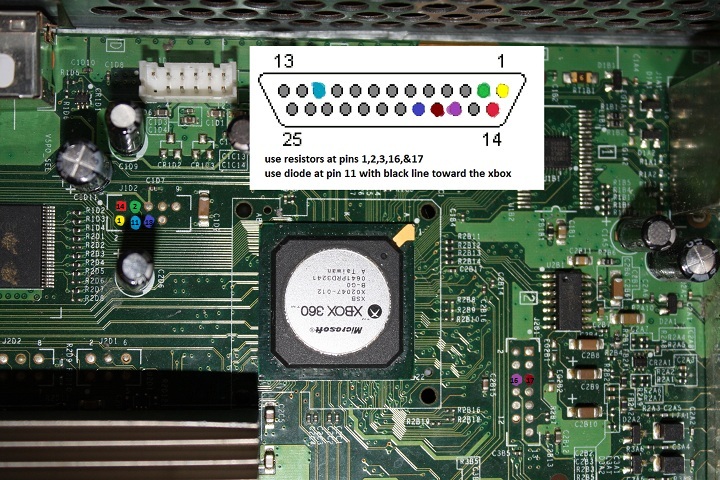
Make LPT cable connections this is the same for all motherboards.


step 4
Mount  a rj45 jack mounted under the HDD
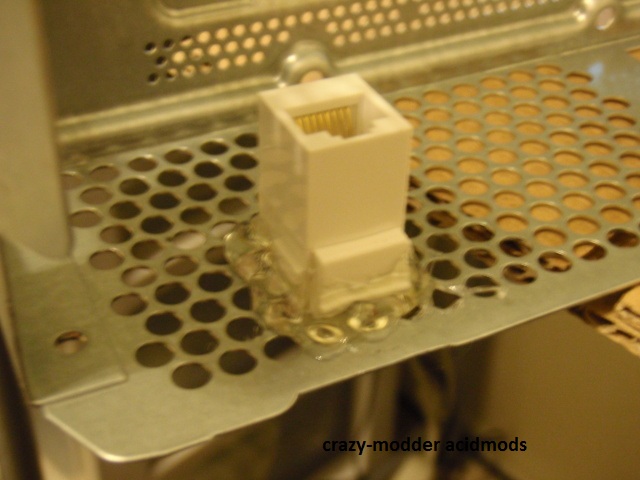


step 5
Then use one end of the Ethernet cable soldered to the motherboard connections,
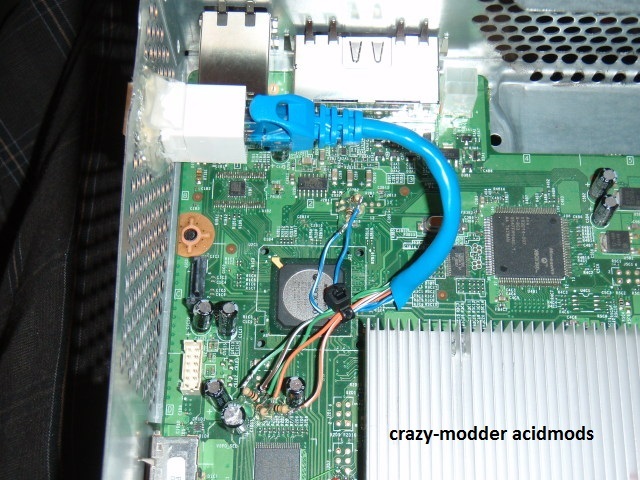

Connect the other end (matching the colors) to the db25 plug.
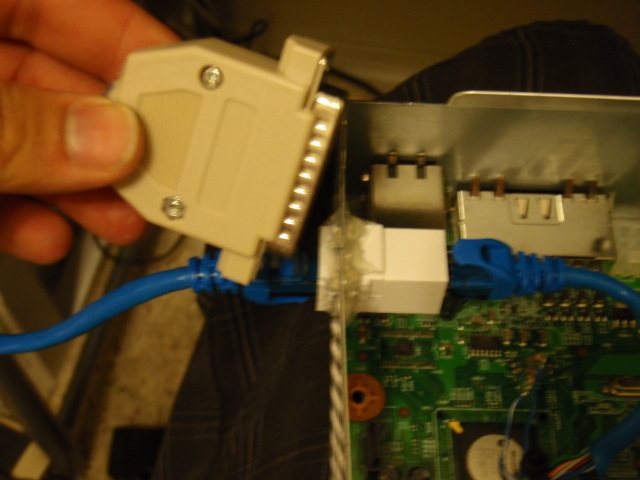

At this point the physical modifications are done, if you are comfortable with your skills, close up the xbox and take a break. Move the xbox into a usable position plug the power adapter into the xbox and plug the lpt cable into the pc you will be using, dont turn the xbox on. 


A few notes here as we move into programing.

1. There are different programs and versions of each to do this, but they all get us where we want to be in the end which is a freeboot up to date dashboard with xexmenu installed.

2. My machine used for dumping and flashing was running a xp os. as I assume units with a lpt port will be.

3. Familiarize your self with the dos commands we are using will help understand whats going on and why.
"C:\Nandpro20e\nandpro.exe lpt: -r16 nand1.bin" this is the command to read the nand.
"C:\" this designates the drive your using "Nandpro20e\" is the folder on that drive "nandpro20e,exe" is the program we are using "lpt" is the port "-r16" read/size" created file name


NAND Dump

Step 1

You will need this: Nandpro20e

The first thing you need to do is unzip nandpro20e into a folder of the same name. Then place that folder in the root of your computers HDD.  start>computer>local disk...place folder here


step 2
Now open a command prompt start>run>cmd

In the command prompt type "C:\Nandpro20e\nandpro.exe lpt: -r16 nand1.bin" without the quotes. Now you will know if you did it right or not. it should look very similar to the following picture, the last line should be a set of numbers that are counting up. Anything else and you need to check your wiring:
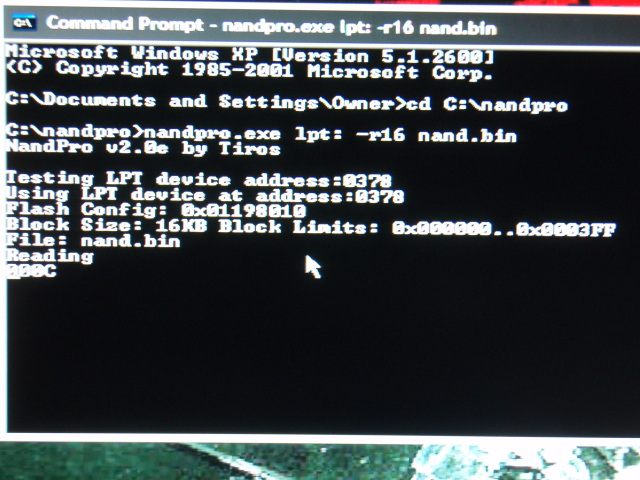
during the course of the read, you man get a "bad block xxx bad block xxx found at 3ff" message. This will be ok,  write down the message so we can remap it later. You will also be able to get this from degraded or the 360 flash tool later if you need to.


step 2
ok after a half an hour or so, it should end at 003ff and await a new command. minimize your terminal and navigate to you nandpro20e folder. (the one we put on the root drive) **this is where things changed for me, and I think it depends on your os setup**in the nandpro20e you should see a new file called nand1.bin if you dont you can do a search for it. I found mine in start>computer>localdisk>documents and settings>matt    Once you find the nand1.bin remember where on your hdd this was placed, all files will be in the same location. rename it to nand original.


step 3
Now go back to your command prompt and dump another copy of the nand using the same command  "C:\Nandpro20e\nandpro.exe lpt: -r16 nand1.bin" without the quotes. It will start counting again wait another half hour and it should finish just like last time.  If you had a bad block in your last read, it should be in the same location as this one continue, we will fix that later.

Once you have two dumps of your nand, we need to make sure they are both identical. to do that we will use a hex editor to compare them.


step 4
You will need this: total commander

After installing Total Commander open it, click file>compare by content, a new window will open. In the first box open the nand original and in the second, open nand1. (or however you renamed them) If total commander states they are identical, you are good to go. If not check soldering and dump the nand again. once you have two identical dumps you can move forward.

Save one copy of your nand, I put mine on a sd card and put it in my desk drawer for safe keeping.


Flashing xell to get cpu key


step 1
We need is our cpu key. To get this we are going to briefly flash xell/free60 onto the xbox.

You will need the correct image for your mother board: free60

Extract the folder for your mobo, extract the .bin file for your mobo and place it in your same folder you found the original read of your nand. To make it easy, rename it to Xell.bin we will now flash Xell.bin onto the xbox 360 so we can get our cpu key.


step 2
With your xbox plugged in (turned off), and the lpt cable plugged in, open your command promt again (start>run>cmd) and enter this without the quotes into the command line: "C:\Nandpro20e\nandpro.exe lpt: -w16 Xell.bin" This should not take very long as we are just flashing the first part of the nand.


step 3
When this is done writing, unplug your lpt cable and turn on your xbox. You will want to have a camera ready to catch a image of your CPU key.
A BLUE SCREEN SHOULD COME UP AND LOOK LIKE THIS
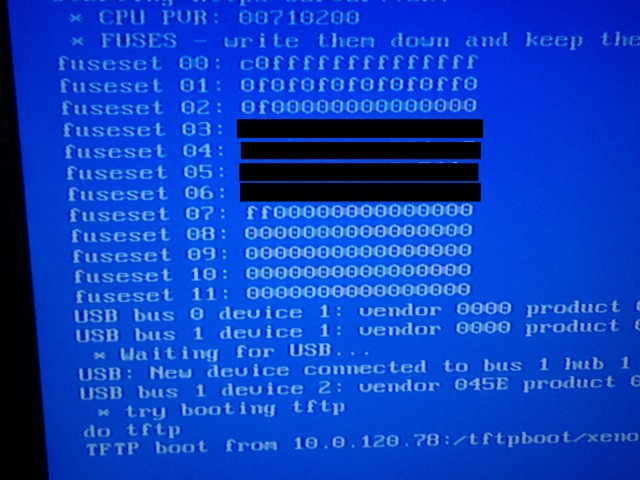
OBVIOUSLY I MARKED OUT MY CPU KEY.  NOW YOUR CPU KEY WILL BE A TOTAL OF 32 NUMBERS
AND OR LETTERS. SO PUT TOGETHER LINES 3/5 OR 4/6, AND THAT WILL BE YOUR CPU KEY.  MAKE SURE TO TAKE A PICTURE OF THE SCREEN, OR WRITE REALLY FAST.  OPEN NOTEPAD AND TYPE YOUR CPU KEY IN THERE. YOU WILL NEED THIS!!

Building a freeboot dashboard
Ok now that you have your cpu key we can build your freeboot image. We will first extract our kv.bin and config.bin from our nand, then use our nand and CPU key to create a freeboot image, then flash our kv and config on top of the new freeboot, fix any bad block errors, and finally flash the entire image onto our xbox. This tutorial is being created in October 2011. For the current xbox dashboard.


step 1
Extract your kv from your nand1 file. To do this, open the command prompt (start>run>cmd)and type
"C:\Nandpro20e\nandpro.exe nand1.bin: -r16 kv.bin 1 1" without the quotes

step2
Extract your config from your nand1 file. To do this open the command prompt (start>run>cmd)and type
"c:\Nandpro20e\nandpro.exe nand1.bin: -r16 config.bin 3de 2" no quotes

Now you have three files we need. nand1.bin, kv.bin, config.bin. we will also need our cpu key

step 3
you will need this: the newest version of freeboot. (included with the 16179 dashboard update)

Open the freeboot program, enter your cpu key, and press create frooboot. it will ask you for your nand file, select your nand1 file and continue. Once it completes, you will have a new file called freeBOOT.bin in your nandpro20e ffolder.

step4
Write your kv.bin and config.bin to your new freeBoot.bin file. To do this open the command prompt  (start>run>cmd)and type:
"c:\Nandpro20e\nandpro.exe freeboot.bin: -w16 kv.bin 1 1

then type:
"c:\Nandpro20e\nandpro.exe freeboot.bin: -w16 config.bin 3de 2

step 5
This next step is only necessary if you had errors in your nand read. If you did not have errors, proceed to the next step.

We need to remap your bad blocks. when you read your nand after reading, in the command promt there was a message that said:
"bad block at ???"
"bad block ??? found at 0x3ff"
(the question mark will be your hex number)

To do this we will use nandpro in the command prompt again. (start>run>cmd)  then type:
"C:\nandpro20e\nandpro freeboot.bin: -r16 ???.bin ??? 1"

Then type:
"C:\nandpro20e\nandpro.exe freeboot.bin: -w16 ???.bin ??? 3FF 1"

If you have more bad blocks, you will want to do the same for those.

step 6
Time to flash our completed freeBOOT.bin image to our xbox.

Hook up the xbox and plug in the lpt cable. Open a command prompt (start<run>cmd) then type:
"c:\nandpro20e\nandpro.exe lpt: -w16 freeboot.bin

After it completes the writing process, the job is done. Plug in an official memory card, hdd, or xbox formatted memory stick and turn on your xbox, it should boot into the current xbox dashboard. It should walk you through the initial xbox setup menu. At this point you are done with the lpt cable. The rest of programming can be done by usb, with a transfer cable using your official hdd, or a burned disk.

Your next set is to apply the official update, then install xex menu, dashlaunch and freestyle dash.

See below for any updates.
« Last Edit: November 10, 2012, 07:54:33 PM by Modded Matt »

Offline Modded Matt

  • Site Owner
  • Administrator
  • Around the block
  • *
  • Posts: 4649
  • Post quality +65/-3
  • Gender: Male
Re: Jtag tutorial
« Reply #1 on: October 08, 2011, 04:06:57 PM »
***updated 11/10/12
Following the above tutorial shows you how to get a Hacked dashboard loaded onto your new jtag. This is just the base dashboard. You will need to install the official update to the current dashboard. If you are following the tutorial above, you will have this update included in the 16179 dashboard bundled download.

To apply the update, open the systemupdate_16179 folder. inside you will find a folder titled $systemupdate. Move that forlder and all items inside of it to the root of a Fat32 formatted flashdrive and insert it into the xbox.

Net you will want to install Freestyle dash and dashlaunch to take full advantage of your jtag. These programs are covered under another tutorial but todays current folders are also included in the acidmods 16179 dashboard bundled download for your convenience.
 
« Last Edit: November 10, 2012, 08:04:31 PM by Modded Matt »

Offline Rodent

  • XBOX,XBOX360,PS3,WII
  • Moderator
  • Around the block
  • *
  • Posts: 2983
  • Post quality +75/-5
  • Gender: Male
  • MODDER, REPAIR, CUSTOM IDEAS.
Re: Jtag tutorial
« Reply #2 on: October 08, 2011, 04:12:17 PM »
Nice Job matt

 Tracey: I cant believe Rodent of all people made my damn day
3D0: snacks cartoons and naps  lol sounds like rodents typcial day :rofl:
Rodent consoles mods

Offline Modded Matt

  • Site Owner
  • Administrator
  • Around the block
  • *
  • Posts: 4649
  • Post quality +65/-3
  • Gender: Male
Re: Jtag tutorial
« Reply #3 on: October 08, 2011, 06:07:02 PM »
here is a fat 32 large formater. it does the job in seconds. (to use an external drive)

www.acidmods.com/moddedmatt/Jtag/format.zip
« Last Edit: November 10, 2012, 08:05:21 PM by Modded Matt »

Offline Modded Matt

  • Site Owner
  • Administrator
  • Around the block
  • *
  • Posts: 4649
  • Post quality +65/-3
  • Gender: Male
Re: Jtag tutorial
« Reply #4 on: October 08, 2011, 06:09:26 PM »
Degraded for those who need to retrieve their error codes or verify kernel

Offline snowcolt17

  • Moderator
  • Acid Modder
  • *
  • Posts: 552
  • Post quality +16/-1
  • Gender: Male
  • If all else fails, reflow it
Re: Jtag tutorial
« Reply #5 on: October 14, 2011, 03:22:22 PM »
here is a fat 32 large formater. it does the gob in seconds. (to use an external drive)

gob or job? lol

nice tutorial thanks alot. reflashing mine since it keeps throwing errors at me


Offline robin1989

  • Site Owner - Site Maintenance & development
  • Administrator
  • Mad Bomber
  • *
  • Posts: 6272
  • Post quality +21/-0
  • Gender: Male
  • Site owner
    • Acidmods
Re: Jtag tutorial
« Reply #6 on: November 22, 2011, 08:11:34 AM »
Bump for my referance. One of my mates is thinking of this. You got the xexmenu part done. Also how is this different to the glitch stuff i have seen.

i am not responsible for what i do or my advice


Get the iPhone 4s from Three using Quidco and recieve £109 cashback

Offline Modded Matt

  • Site Owner
  • Administrator
  • Around the block
  • *
  • Posts: 4649
  • Post quality +65/-3
  • Gender: Male
Re: Jtag tutorial
« Reply #7 on: November 22, 2011, 08:24:56 AM »
lol I forgot about the xexmenu. I will work on updating this over the weekend.

xex menu, then FSD, avatar/kenect update, then dashlaunch after that your set....

Offline Modded Matt

  • Site Owner
  • Administrator
  • Around the block
  • *
  • Posts: 4649
  • Post quality +65/-3
  • Gender: Male
Re: Jtag tutorial
« Reply #8 on: November 27, 2011, 04:26:46 PM »
heere is a method called reverse jtag. I am going to try on the next xbox I do.

« Last Edit: November 27, 2011, 04:27:58 PM by modded matt »

Offline Rodent

  • XBOX,XBOX360,PS3,WII
  • Moderator
  • Around the block
  • *
  • Posts: 2983
  • Post quality +75/-5
  • Gender: Male
  • MODDER, REPAIR, CUSTOM IDEAS.
Re: Jtag tutorial
« Reply #9 on: November 27, 2011, 04:33:56 PM »
to reverse it back to normal or something different? explain more?

 Tracey: I cant believe Rodent of all people made my damn day
3D0: snacks cartoons and naps  lol sounds like rodents typcial day :rofl:
Rodent consoles mods

Offline Modded Matt

  • Site Owner
  • Administrator
  • Around the block
  • *
  • Posts: 4649
  • Post quality +65/-3
  • Gender: Male
Re: Jtag tutorial
« Reply #10 on: November 27, 2011, 04:42:37 PM »
reverse as in all actions (solder points) are preformed from the bottom of the mobo.

I lifted the red pad, and had to find alternate methods.
« Last Edit: November 27, 2011, 04:43:14 PM by modded matt »

Offline Rodent

  • XBOX,XBOX360,PS3,WII
  • Moderator
  • Around the block
  • *
  • Posts: 2983
  • Post quality +75/-5
  • Gender: Male
  • MODDER, REPAIR, CUSTOM IDEAS.
Re: Jtag tutorial
« Reply #11 on: November 27, 2011, 04:49:09 PM »
damn solder points suck no wonder why these things had so many problems... thanks for the info , every little bit helps let me know when  you get the other one done i sent you  :tup:

 Tracey: I cant believe Rodent of all people made my damn day
3D0: snacks cartoons and naps  lol sounds like rodents typcial day :rofl:
Rodent consoles mods

Offline 3D0kassiah

  • Acid Modder
  • *
  • Posts: 809
  • Post quality +19/-2
  • Gender: Male
  • Acidmods User
Re: Jtag tutorial
« Reply #12 on: December 28, 2011, 08:00:01 PM »
hey matt i have a xenon already jtagged has xell with freeboot dont have original nand but i can dump the hacked nand how do i go about updating to the newest dashboard?
Tracey: f off Rodent
rodent:i would of flew it to bill gates and shoved it up his a$$

Offline snowcolt17

  • Moderator
  • Acid Modder
  • *
  • Posts: 552
  • Post quality +16/-1
  • Gender: Male
  • If all else fails, reflow it
Re: Jtag tutorial
« Reply #13 on: December 28, 2011, 08:12:55 PM »
i read somewhere that you can dump your current nand with flash360. then load it with best pigs. and di it like that..


Offline Modded Matt

  • Site Owner
  • Administrator
  • Around the block
  • *
  • Posts: 4649
  • Post quality +65/-3
  • Gender: Male
Re: Jtag tutorial
« Reply #14 on: December 29, 2011, 05:43:18 AM »
use a donor nand image.

I would first dump the hacked nand u currently have and back it up, so if something happens, u can always go back to the state your in now.

Offline Nevbox

  • Granny Spanker
  • *
  • Posts: 356
  • Post quality +12/-5
Re: Jtag tutorial
« Reply #15 on: January 14, 2012, 01:20:23 PM »
Hey Matt

I am doing a Jtag soon and if you need any new pics for the tut just let me know.

Nevbox

Offline Phantom

  • Club AM VIP
  • Granny Spanker
  • *
  • Posts: 355
  • Post quality +11/-1
  • Gender: Male
Re: Jtag tutorial
« Reply #16 on: January 24, 2012, 10:35:46 PM »
should there be something connected to pin 3? or is that just a typo in this image?

Offline Rodent

  • XBOX,XBOX360,PS3,WII
  • Moderator
  • Around the block
  • *
  • Posts: 2983
  • Post quality +75/-5
  • Gender: Male
  • MODDER, REPAIR, CUSTOM IDEAS.
Re: Jtag tutorial
« Reply #17 on: January 25, 2012, 02:22:30 AM »
there is a typo in that image,

100ohm Resistor should go on pins 1.2,14.16 & 17

Also I am not sure about the diode on pin 11 crazy-modder's doesn't show it on his . as shown above.
« Last Edit: January 25, 2012, 02:43:23 AM by Rodent »

 Tracey: I cant believe Rodent of all people made my damn day
3D0: snacks cartoons and naps  lol sounds like rodents typcial day :rofl:
Rodent consoles mods

Offline Modded Matt

  • Site Owner
  • Administrator
  • Around the block
  • *
  • Posts: 4649
  • Post quality +65/-3
  • Gender: Male
Re: Jtag tutorial
« Reply #18 on: January 25, 2012, 05:03:34 AM »
there is a typo in that image,

100ohm Resistor should go on pins 1.2,14.16 & 17

Also I am not sure about the diode on pin 11 crazy-modder's doesn't show it on his . as shown above.

you are correct on the resistors, that is a typo. I will fix this weekend.

as for the diode at pin 11 this is required on any mobo other than xenon, and I still recommend using it then. without it you will get read errors on every block.

Offline snowcolt17

  • Moderator
  • Acid Modder
  • *
  • Posts: 552
  • Post quality +16/-1
  • Gender: Male
  • If all else fails, reflow it
Re: Jtag tutorial
« Reply #19 on: January 25, 2012, 07:27:45 AM »
my first dumps i used a old ass dell. and the lpt.. i used resistors and no go. and pin 11, i read somewhere where you had to put the diode at the mobo.. not sure but i did and it worked fine


Offline Anonamous

  • The Unknown Identity
  • Granny Spanker
  • *
  • Posts: 472
  • Post quality +14/-1
  • Gender: Male
  • Electrical Engineering Student
Re: Jtag tutorial
« Reply #20 on: January 25, 2012, 11:41:04 AM »
my first dumps i used a old ass dell. and the lpt.. i used resistors and no go. and pin 11, i read somewhere where you had to put the diode at the mobo.. not sure but i did and it worked fine

just like the resistors, put in the diode at the beginning. if nandpro doesn't find the flash controller, then remove the resistors and try again. It should work fine. For some people, if you do not have the diode in, your nand dumps will never be identical and you won't have a good dump.

Offline Nevbox

  • Granny Spanker
  • *
  • Posts: 356
  • Post quality +12/-5
Re: Jtag tutorial
« Reply #21 on: January 27, 2012, 02:40:19 PM »
Hey about the points for all other motherboards (the links), is there an alternative solder points for them, as I am slightly concerned about doing the red one and for the yellow one is it ok the follow the board connector onto the motherboard, because I don't want to have a wire connecting them. I found a point on the motherboard connector to the board.

If anyone can help that would be great!

-Nevbox
« Last Edit: January 28, 2012, 05:18:33 AM by Nevbox »

Offline Modded Matt

  • Site Owner
  • Administrator
  • Around the block
  • *
  • Posts: 4649
  • Post quality +65/-3
  • Gender: Male
Re: Jtag tutorial
« Reply #22 on: January 27, 2012, 03:05:05 PM »
ok, your post is confusing. but ill try

the alternate jtag points for non xenon boards is posted in reply #8. these points are all on the bottom of the mobo. (I strongly recommend protecting your efuses while your back there!!!)

as for the red wire you speak of, I think you meant yellow, and it is also accessible from the bottom in the alternate points/

Offline Nevbox

  • Granny Spanker
  • *
  • Posts: 356
  • Post quality +12/-5
Re: Jtag tutorial
« Reply #23 on: January 28, 2012, 05:25:17 AM »
ok, your post is confusing. but ill try

the alternate jtag points for non xenon boards is posted in reply #8. these points are all on the bottom of the mobo. (I strongly recommend protecting your efuses while your back there!!!)

as for the red wire you speak of, I think you meant yellow, and it is also accessible from the bottom in the alternate points/
Sorry about that post, it was late. I was talking about both of them, the red one has a very small point (to the left) which I am not so confident about soldering and from reply 8 can you substitute points from the original diagram for that one or do all points have to be from one or the other?

Edited that last post

- Nevbox

EDIT: where can I poke wires through on the mobo?
« Last Edit: January 28, 2012, 05:26:32 AM by Nevbox »

Offline Modded Matt

  • Site Owner
  • Administrator
  • Around the block
  • *
  • Posts: 4649
  • Post quality +65/-3
  • Gender: Male
Re: Jtag tutorial
« Reply #24 on: January 28, 2012, 06:16:12 AM »
in reply #8 everything is done on the bottom, you will only do these points. dont do it on the top and the bottom.

you dont need to bring anything over the top, but if you did, the corner of the fan is a good spot.


so:
do the jtag points on the bottom of the mobo
do the lpt cable connections on the top


protect the efuses. here i will look for a good pic of them one sec...
« Last Edit: January 28, 2012, 06:17:44 AM by Modded Matt »

Offline Nevbox

  • Granny Spanker
  • *
  • Posts: 356
  • Post quality +12/-5
Re: Jtag tutorial
« Reply #25 on: January 28, 2012, 06:28:31 AM »
Found a great tut on that http://team-xecuter.com/forums/showthread.php?t=62331

Ok and thanks, the reverse method is def the best and the tidiest.

Offline Anonamous

  • The Unknown Identity
  • Granny Spanker
  • *
  • Posts: 472
  • Post quality +14/-1
  • Gender: Male
  • Electrical Engineering Student
Re: Jtag tutorial
« Reply #26 on: January 28, 2012, 06:38:08 AM »
Found a great tut on that http://team-xecuter.com/forums/showthread.php?t=62331

Ok and thanks, the reverse method is def the best and the tidiest.

I do not recommend bridging the volt regulator or whatever that is, just remove the r6t3 resistor. If you ever wanted to put it back you can just take any 10k ohm 0603 resistor and solder it in place.

Offline Modded Matt

  • Site Owner
  • Administrator
  • Around the block
  • *
  • Posts: 4649
  • Post quality +65/-3
  • Gender: Male
Re: Jtag tutorial
« Reply #27 on: January 28, 2012, 06:47:49 AM »
the tut is good.  its a matter of preference, i never remove the resistor, and just bridge the points. never had an issue, ive never needed to undo it, but if i did a solder wick would clean it right up.

Offline Nevbox

  • Granny Spanker
  • *
  • Posts: 356
  • Post quality +12/-5
Re: Jtag tutorial
« Reply #28 on: January 28, 2012, 07:19:39 AM »
Matt this thread could use compiling into the top post.

Offline FOOKz™

  • Hardware Modder
  • Research & Development
  • E = MC² Mad Scientist
  • *
  • Posts: 2070
  • Post quality +37/-2
  • Electronics Expert Electrical Engineer
Re: Jtag tutorial
« Reply #29 on: January 28, 2012, 11:33:02 AM »
To fix an E80 error (bad update, efuse error)... you will have to restore the missing resistor with a 10K ohm resistor and remove the bridged solder point then update with the old dashboard or simply restart your console. Afterwards it should fix it, then you can go ahead and remove the resistor and bridge the point.

Follow my Instagram and subscribe to my YouTube


SMF spam blocked by CleanTalk
SimplePortal 2.3.5 © 2008-2012, SimplePortal